How to Tune Your Racing Carburetor for Optimal Performance
Table of Contents
- Idle Circuit
- Main Metering Circuit
- Power Enrichment Circuit (Power Valve)
- Accelerator Pump Circuit
- Secondary Circuit
Introduction
Carburetors have been used in cars for over a century. Despite this long history, many racers still find them hard to perfect. Essentially, a carburetor mixes air and fuel in the right amounts at the right time. This is even more important in oval track racing. The carburetor needs to respond well from idle to wide-open throttle. Moreover, it needs to be consistent lap after lap. Therefore, understanding and tuning your carburetor can give you an edge on the track.
Carburetor Circuits and Their Functions
Idle Circuit
Function: The idle circuit controls the fuel mixture when the engine is idling or at very low throttle openings. It makes sure the engine gets the right amount of fuel to keep a stable idle speed.

Adjustments:
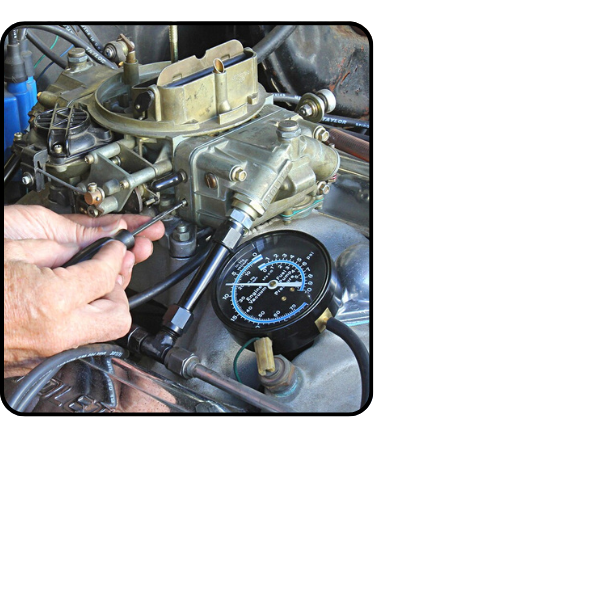
- Idle Mixture Screws: These screws adjust the air/fuel ratio at idle. Turning them in makes the mixture richer (more fuel). Turning them out makes it leaner (more air).
- Idle Speed Screw: This screw adjusts the throttle plate position at idle, controlling the engine’s idle speed.
Tools Needed:
- Vacuum Gauge: Connect the vacuum gauge to a manifold vacuum port. Adjust the idle mixture screws to get the highest steady vacuum reading.
- Tachometer: Use a tachometer to monitor engine RPM. Adjust the idle speed screw to keep a stable idle speed.
Impact on Drivability:
- Proper Adjustment: A correctly adjusted idle circuit will provide a smooth and stable idle. This makes the car easier to control at low speeds.
- Improper Adjustment: If the idle mixture is too lean, the engine may stall or hesitate when moving from idle to part throttle. On the other hand, if it is too rich, it can cause rough idling and poor fuel economy.
Main Metering Circuit
Function: The main metering circuit delivers the primary fuel supply during mid-range and high-speed engine operation. It works when the throttle opens beyond the idle position.
Adjustments:
- Main Jets: The size of the main jets determines the amount of fuel delivered. Larger jets increase fuel flow (richer mixture). Conversely, smaller jets decrease it (leaner mixture).
Tools Needed:
- Jet Wrench: Use a jet wrench to remove and replace the main jets in the carburetor.
Impact on Drivability:
- Proper Adjustment: Ensures smooth acceleration and consistent power across a wide range of engine speeds.
- Improper Adjustment: Too lean can cause hesitation, surging, and potential engine damage from overheating. Conversely, too rich can lead to fouled spark plugs, poor fuel economy, and sluggish performance.
Power Enrichment Circuit (Power Valve)
Function: The power enrichment circuit provides extra fuel during periods of high load or acceleration. This prevents a lean condition and ensures enough power.
Adjustments:
- Power Valve: The power valve opens at a specific vacuum level to enrich the fuel mixture. The rating of the power valve (e.g., 4.5, 6.5) shows the vacuum level at which it opens.
Tools Needed:
- Vacuum Gauge: Monitor manifold vacuum to select the right power valve. The valve should open at about half the engine’s idle vacuum reading.
Impact on Drivability:
- Proper Adjustment: Ensures the engine gets enough fuel under heavy load. This prevents detonation and ensures smooth, powerful acceleration.
- Improper Adjustment: A power valve that opens too early can cause an overly rich mixture. This reduces performance and fuel efficiency. If it opens too late, it can lead to a lean condition and potential engine damage.
Accelerator Pump Circuit
Function: The accelerator pump circuit gives a quick shot of fuel to prevent a lean condition when the throttle is rapidly opened. This helps avoid hesitation or stalling during sudden acceleration.
Adjustments:
- Pump Cam: Controls the duration and intensity of the fuel shot from the accelerator pump. Different cam profiles can be used to tailor the fuel delivery.
- Squirters (Discharge Nozzles): The size of the squirters determines the volume of fuel delivered. Larger squirters provide more fuel. Smaller ones provide less.
Tools Needed:
- Feeler Gauge: Measure the clearance between the accelerator pump arm and the pump lever. Ensure it is between 0.010 and 0.015 inches.
- Screwdrivers and Wrenches: Adjust the pump cam and squirters using the right tools.
Determining Correct Adjustment:
- Visual Inspection: Ensure there is a slight gap (0.010 to 0.015 inches) between the pump arm and the lever at idle.
- Throttle Snap Test: Quickly open the throttle and watch the engine response. If there is hesitation, increase the squirter size or adjust the pump cam for a larger fuel shot.
- Drive Test: Conduct a road test. Check for smooth and immediate throttle response. Fine-tune the adjustments based on real-world performance.
Impact on Drivability:
- Proper Adjustment: Prevents hesitation and stumbling during rapid throttle changes. This ensures smooth and responsive acceleration.
- Improper Adjustment: Too small a shot can cause hesitation or stalling. Too large a shot can result in a rich condition, causing the engine to bog down.
Secondary Circuit
Function: In four-barrel carburetors, the secondary circuit provides additional fuel and air flow during high-demand situations, like wide-open throttle.
Adjustments:
- Secondary Jets: These control the fuel flow through the secondary barrels.
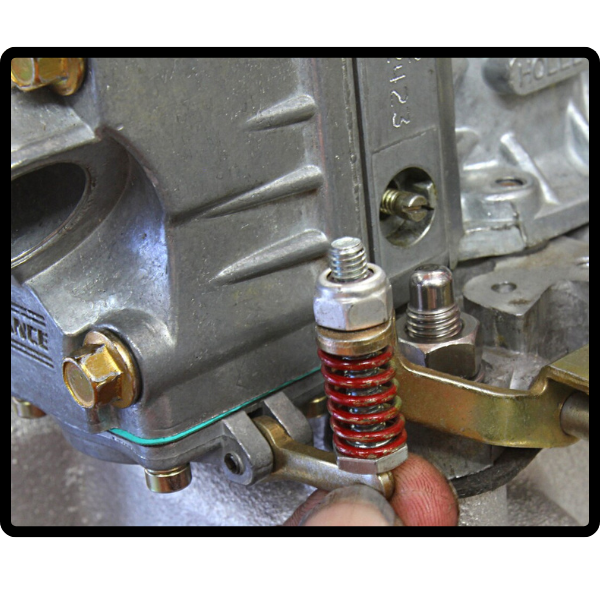
- Secondary Opening Rate: Adjustable via the QuickLink system, which can modify the opening rate to match track conditions and driver preferences.
Tools Needed:
- Jet Wrench: Use a jet wrench to remove and replace the secondary jets.
- Vacuum Gauge and Spring Kit: Use a vacuum gauge to monitor the opening rate of the secondaries and adjust the spring tension accordingly.
Impact on Drivability:
- Proper Adjustment: Ensures a smooth transition to high power levels without bogging down or stumbling. This provides strong acceleration and top-end power.
- Improper Adjustment: Incorrect jetting or opening rate can cause flat spots, hesitation, or excessive fuel consumption.
Maintenance Tips for Consistent Performance
Float Levels: Ensure the float levels are set correctly. This maintains consistent fuel delivery. The fuel should be just about to bead out of the sight hole in older carburetors or aligned with the glass sight in newer models.
Tools Needed:
- Float Gauge: Use a float gauge to accurately measure and adjust the float levels.
Power Valve Maintenance: Regularly check and replace power valves. This prevents issues caused by hardened rubber from ethanol fuels. It helps maintain consistent enrichment during high-load conditions.
Timing Issues: Verify that the distributor’s mechanical advance is set correctly. Improper timing can mimic carburetor issues, causing poor performance and drivability problems.
Tools Needed:
- Timing Light: Use a timing light to check and adjust the ignition timing.
Checking for Leaks: Inspect all fuel lines and hoses for pinholes. These can cause air to mix with fuel, leading to erratic performance. Use vacuum testing to identify and resolve these issues.
Tools Needed:
- Vacuum Pump and Gauge: Use a vacuum pump and gauge to test for and locate vacuum leaks.
Common Carburetor Issues and Solutions
Idle Quality: Poor idle quality can be due to vacuum leaks, improper idle mixture settings, or issues with the carburetor base gasket. Ensuring all seals are intact and adjusting the idle mixture screws correctly can improve idle quality.
Flat Spots and Hesitation: These issues often arise from an inadequate accelerator pump shot or a failing power valve. Ensuring the accelerator pump is correctly sized and functioning, and replacing faulty power valves can resolve these problems.
Hard Starting: Hard starting can be caused by either too much or too little fuel. Ensuring the choke mechanism is functioning correctly and adjusting the accelerator pump settings can help alleviate starting issues.
Flooding: Flooding occurs when the engine gets too much fuel. This is often due to a stuck float, excessive accelerator pump action, or high fuel pressure. Therefore, inspecting and adjusting these components can prevent flooding.
Air/Fuel Ratio: Maintaining the correct air/fuel ratio is essential for performance and engine longevity. Thus, using a wideband O2 sensor during tuning can help achieve the optimal ratio for your engine.
Carburetor Sizing: Choosing the right carburetor size is crucial. A carburetor that is too large can hurt throttle response and low-end performance. Conversely, one that is too small can restrict top-end power. Therefore, matching the carburetor size to your engine’s displacement and operating range ensures optimal performance.
Conclusion
By understanding and properly adjusting thevarious circuits of your carburetor, you can achieve optimal performance and drivability for your race car. Regular maintenance, precise adjustments, and a focus on track performance over dyno numbers will help you gain a competitive edge on race day. Therefore, stay tuned for more practical tips and in-depth guides to keep your race car running strong all season long at StreetStockTech.com.
FAQs
Q: How often should I check my carburetor’s float levels?
A: Check the float levels every few races to ensure consistent fuel delivery and avoid flooding or lean conditions.
Q: What are the signs of a failing power valve?
A: Common signs include bogging during acceleration, poor fuel economy, and inconsistent engine performance under load.
Q: How can I improve throttle response on my race car?
A: Properly sizing the accelerator pump squirters and ensuring the pump cam is correctly adjusted can significantly improve throttle response.
Q: Can a vacuum leak affect my carburetor’s performance?
A: Yes, a vacuum leak can cause poor idle quality, hesitation, and overall inconsistent performance. Therefore, regularly inspect and seal all potential leak points.
Q: What is the ideal air/fuel ratio for a racing engine?
A: The optimal air/fuel ratio for performance engines typically ranges between 12:1 and 13:1. Therefore, using a wideband O2 sensor can help achieve this balance.
photo credits to www.racingpartsales.com

